: ble_app_bps 프로젝트는 Blood Pressure profile 중
blood pressure service 와 Device information service 를
추가로 Battery Service 를 적용한 예제 프로그램 입니다.
목차
1> Nordic document
https://infocenter.nordicsemi.com/topic/sdk_nrf5_v17.1.0/ble_sdk_app_bps.html
nRF5 SDK v17.1.0: Blood Pressure Application
This example requires one of the following SoftDevices: S112, S132, S140 Important: Before you run this example, make sure to program the SoftDevice. The Blood Pressure Application is an example that implements the Blood Pressure profile using the hardware
infocenter.nordicsemi.com
2> 프로젝트 위치
<InstallFolder>\examples\ble_peripheral\ble_app_bps
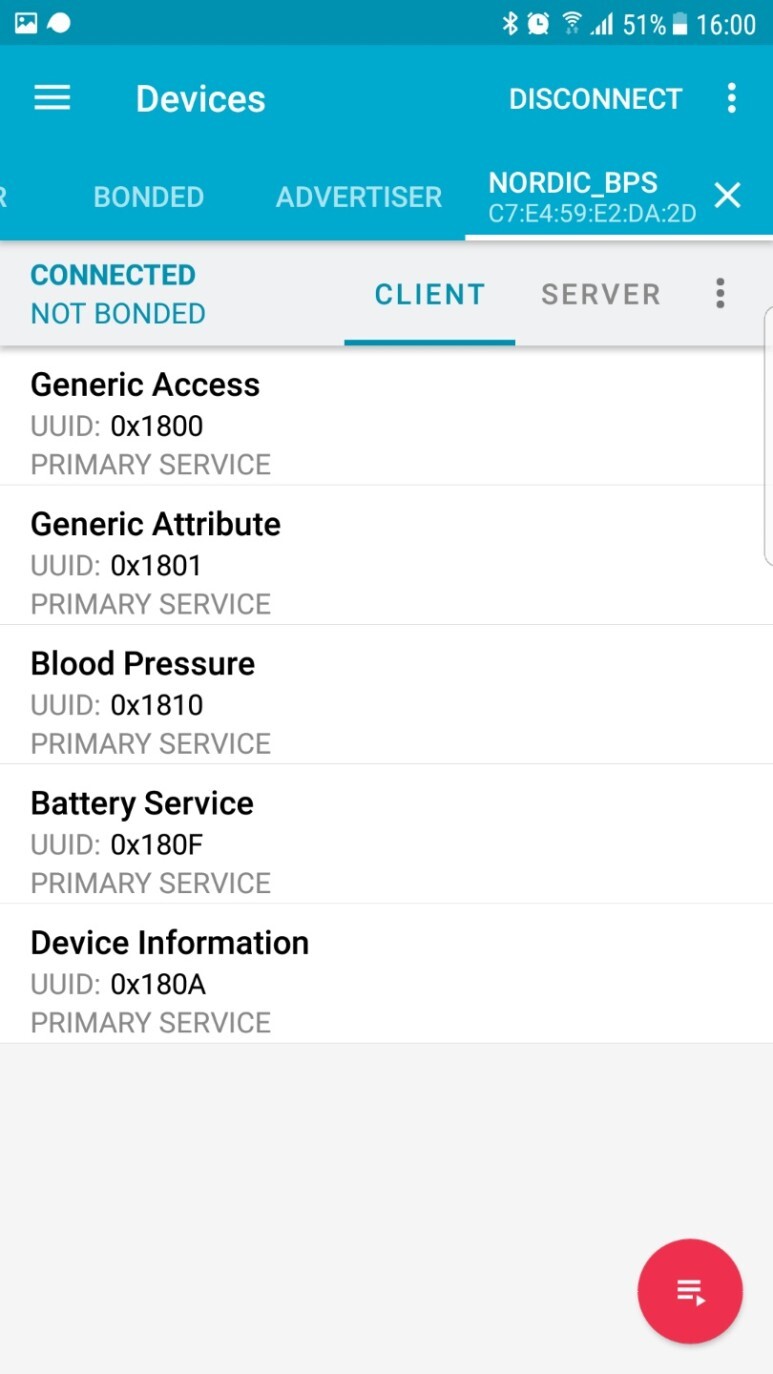
3> nRF connect 앱을 통한 연결후 service / characteristics
: 5 개의 서비스 는 아래와 같습니다.
(Generic Access , Generic Attribute, Blood Pressure, Battery Service, Device Information)
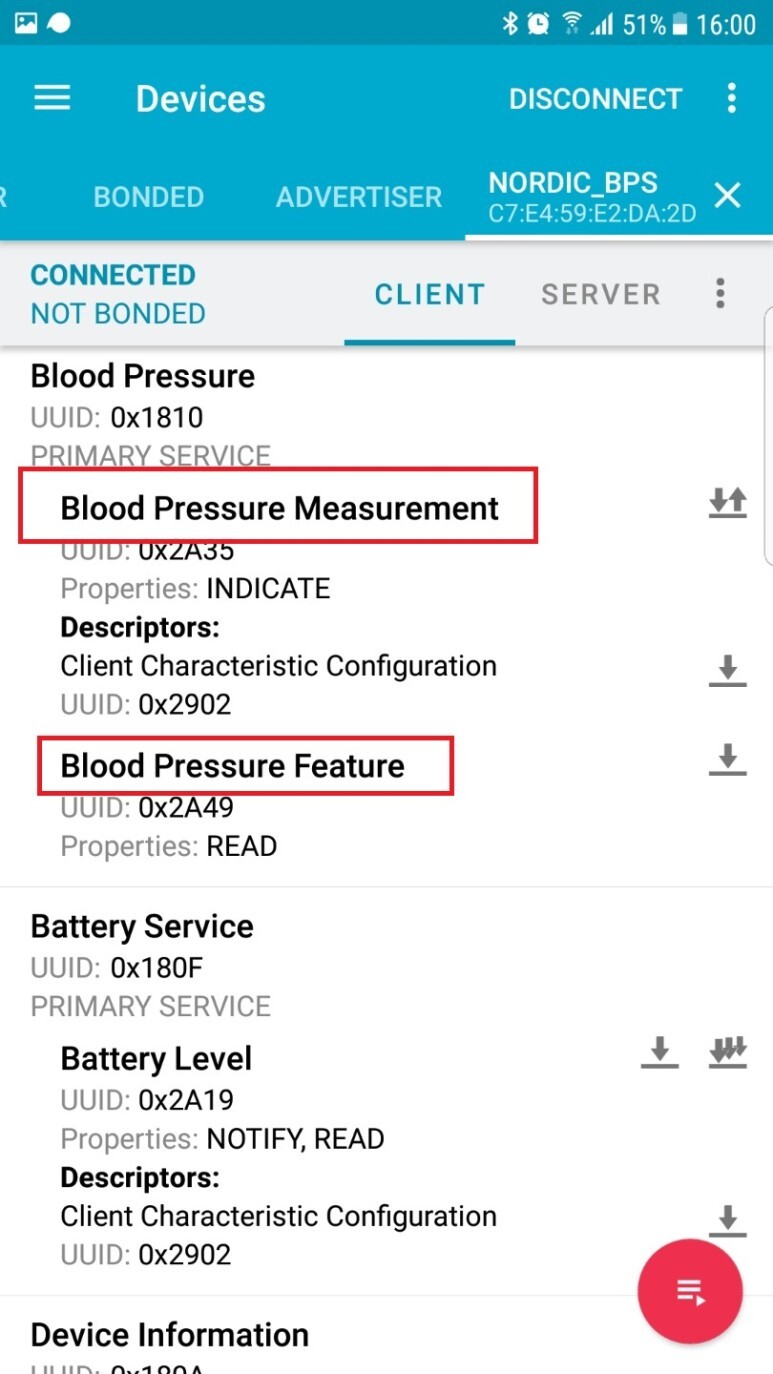
▶ Blood Pressure 서비스 안의 2개의 characteristic 은 아래와 같습니다.
4> nRF Logger 메시지 ( nRF Connect 앱 통한 Connect 완료시 까지)
nRF Connect, 2022-06-17
Nordic_BPS (C7:E4:59:E2:DA:2D)
V	10:30:56.667	Connecting to C7:E4:59:E2:DA:2D...
D	10:30:56.667	gatt = device.connectGatt(autoConnect = false, TRANSPORT_LE, preferred PHY = LE 1M)
D	10:30:56.732	[Callback] Connection state changed with status: 0 and new state: CONNECTED (2)
I	10:30:56.732	Connected to C7:E4:59:E2:DA:2D
D	10:30:56.733	wait(1600ms)
D	10:30:56.755	[Broadcast] Action received: android.bluetooth.device.action.ACL_CONNECTED
V	10:30:58.334	Discovering services...
D	10:30:58.334	gatt.discoverServices()
D	10:30:58.343	[Callback] Services discovered with status: 0
I	10:30:58.343	Services discovered
V	10:30:58.356	Generic Access (0x1800)
- Device Name [R W] (0x2A00)
- Appearance [R] (0x2A01)
- Peripheral Preferred Connection Parameters [R] (0x2A04)
- Central Address Resolution [R] (0x2AA6)
Generic Attribute (0x1801)
Blood Pressure (0x1810)
- Blood Pressure Measurement [I] (0x2A35)
   Client Characteristic Configuration (0x2902)
- Blood Pressure Feature [R] (0x2A49)
Battery Service (0x180F)
- Battery Level [N R] (0x2A19)
   Client Characteristic Configuration (0x2902)
Device Information (0x180A)
- Manufacturer Name String [R] (0x2A29)
- Model Number String [R] (0x2A24)
- System ID [R] (0x2A23)
D	10:30:58.356	gatt.setCharacteristicNotification(00002a35-0000-1000-8000-00805f9b34fb, true)
D	10:30:58.359	gatt.setCharacteristicNotification(00002a19-0000-1000-8000-00805f9b34fb, true)
I	10:31:02.745	Connection parameters updated (interval: 980.0ms, latency: 0, timeout: 4000ms)
5> 상세분석
5-1> 초기화 관련 코드
    log_init();
    timers_init();
    buttons_leds_init(&erase_bonds);
    power_management_init();
    ble_stack_init();
    gap_params_init();
    gatt_init();
    advertising_init();
    services_init();
    sensor_simulator_init();
    conn_params_init();
    peer_manager_init();
5-2> 배터리 notification 관련 코드
▶ 배터리 레벨은 주기적으로 체킹해야 하므로 timer를 사용하고 간격은 2초간격 입니다.
// timer 관련
APP_TIMER_DEF(m_battery_timer_id);

void timers_init(void)
{
	~~~~ 중략 ~~~~
    app_timer_init();
    app_timer_create(&m_battery_timer_id,
                 APP_TIMER_MODE_REPEATED,
                 battery_level_meas_timeout_handler);
}

void battery_level_meas_timeout_handler(void * p_context)
{
    battery_level_update();
}

app_timer_start(m_battery_timer_id, BATTERY_LEVEL_MEAS_INTERVAL, NULL);

// battery 정보 업데이트
void battery_level_update(void)
{
	~~~~ 중략 ~~~~
    ble_bas_battery_level_update(&m_bas, battery_level, BLE_CONN_HANDLE_ALL);
}


ret_code_t ble_bas_battery_level_update(ble_bas_t * p_bas,  uint8_t     battery_level,
                                        uint16_t    conn_handle)
{
    ble_gatts_value_t  gatts_value;
    ~~~~ 중략 ~~~~
    gatts_value.p_value = &battery_level;
    sd_ble_gatts_value_set(BLE_CONN_HANDLE_INVALID,
                  p_bas->battery_level_handles.value_handle,
                  &gatts_value);
    ~~~~ 중략 ~~~~
    ble_gatts_hvx_params_t hvx_params;
    ~~~~ 중략 ~~~~
    hvx_params.type   = BLE_GATT_HVX_NOTIFICATION;
    battery_notification_send(&hvx_params, conn_handle);
}

ret_code_t battery_notification_send(ble_gatts_hvx_params_t * const p_hvx_params,uint16_t conn_handle)
{
    sd_ble_gatts_hvx(conn_handle, p_hvx_params);
}
5-3> BPS indication 관련 코드
▶ 페어링이 되어 있는 상태에서 CCCD 에 indication enable 할 경우와 button1 을 누를경우 호출됩니다.
void blood_pressure_measurement_send(void)
{
    ~~~~ 중략 ~~~~
    ble_bps_measurement_send(&m_bps, &simulated_meas);
}

uint32_t ble_bps_measurement_send(ble_bps_t * p_bps, ble_bps_meas_t * p_bps_meas)
{
    nrf_ble_gq_req_t       bps_req;
    bps_measurement_encode(p_bps, p_bps_meas, encoded_bps_meas);
    ~~~~ 중략 ~~~~
    bps_req.type                     = NRF_BLE_GQ_REQ_GATTS_HVX;
    bps_req.params.gatts_hvx.type    = BLE_GATT_HVX_INDICATION;
    nrf_ble_gq_item_add(p_bps->p_gatt_queue, &bps_req, p_bps->conn_handle);
}

bool request_process(nrf_ble_gq_req_t const * const p_req, uint16_t conn_handle)
{
    ~~~~ 중략 ~~~~
    case NRF_BLE_GQ_REQ_GATTS_HVX:
    {
        sd_ble_gatts_hvx(conn_handle, &p_req->params.gatts_hvx);
		break;
    }
    ~~~~ 중략 ~~~~
}
>> indication data관련 ble_app_interactive 프로젝트 사용한 로그입니다.
uart_cli:~$ gatt indication on C7:E4:59:E2:DA:2D 2A35
Type of write operation: 0x1
Data was written to the server
Indication data: 6 117 0 76 0 103 0 220 7 12 5 11 5 3 60 0
>> button1 클릭
Indication data: 4 121 0 81 0 106 0 72 0
>> button1 클릭
Indication data: 2 138 0 88 0 120 0 220 7 12 5 11 5 57
==> 위에서 들어온 indication data 해석은 bps_measurement_encode() 함수 분석하시면 됩니다.
첫번째 들어온 데이터 만 해석해 보면
6 117 0 76 0 103 0 220 7 12 5 11 5 3 60 0
Flag Systolic diastolic mean arterial timestamp (7) pulse rate
▶ indication 또는 notification 시 sd_ble_gatts_hvx() 가 호출되야 합니다.
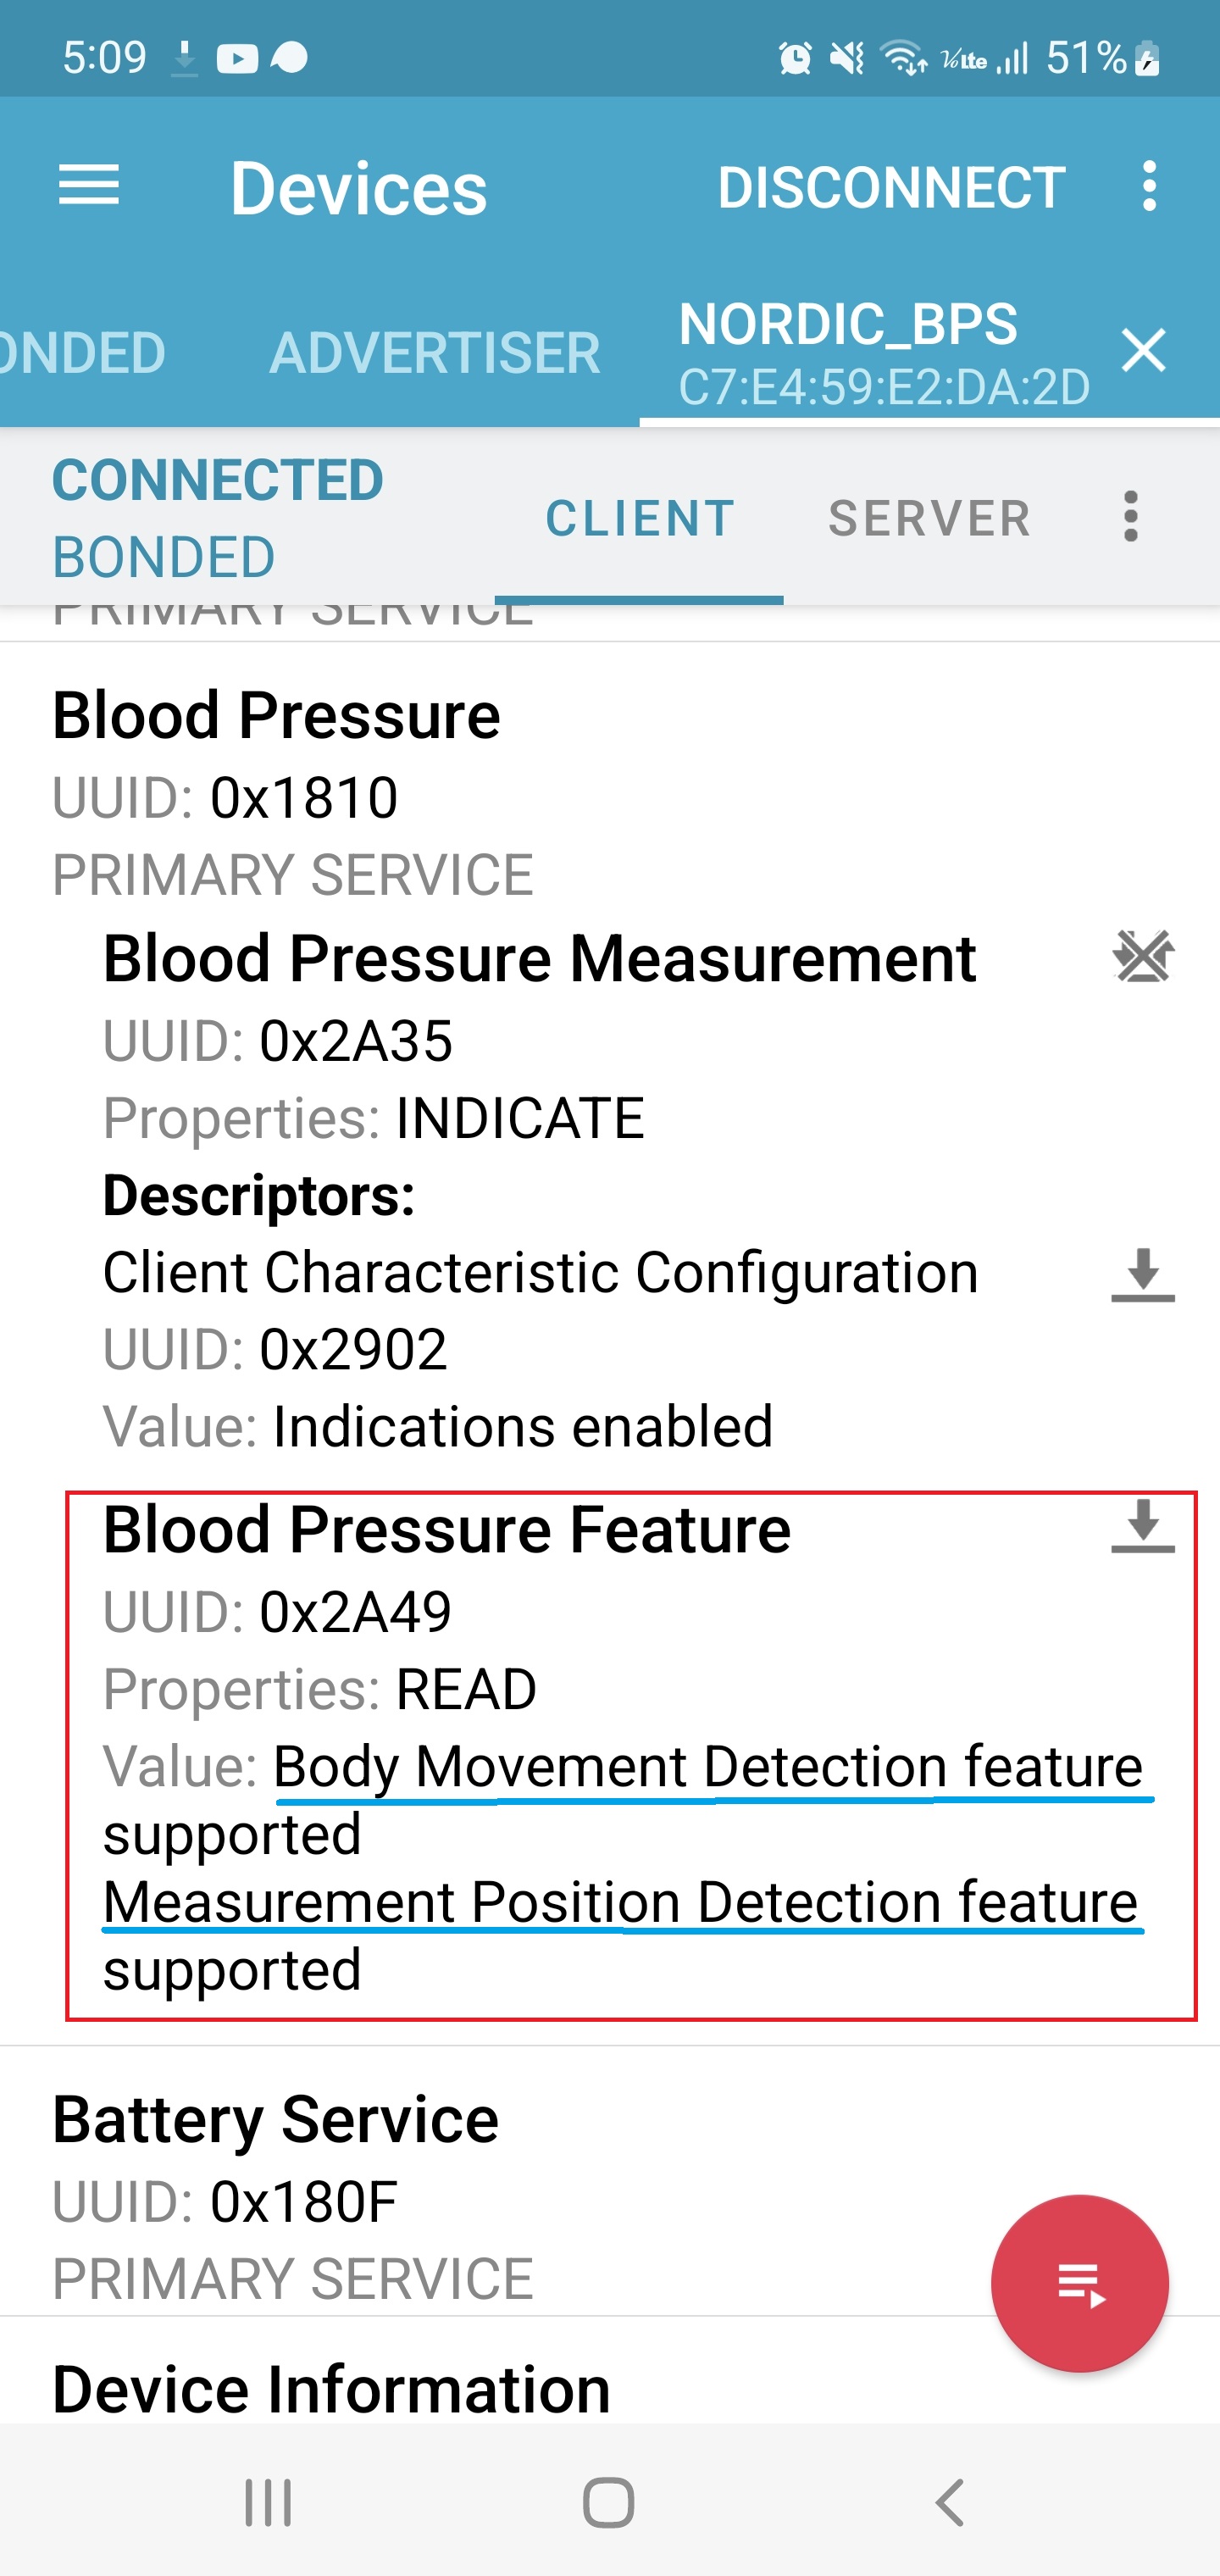
5-4> 아래그림의 Blood Pressure Measurement 관련코드
void services_init(void)
{
    ble_bps_init_t     bps_init;
    ~~~~ 중략 ~~~~
    bps_init.feature  = BLE_BPS_FEATURE_BODY_MOVEMENT_BIT |
                        BLE_BPS_FEATURE_MEASUREMENT_POSITION_BIT;
    ~~~~ 중략 ~~~~
    ble_bps_init(&m_bps, &bps_init);
    ~~~~ 중략 ~~~~
}

#define BLE_UUID_BLOOD_PRESSURE_FEATURE_CHAR                     0x2A49
uint32_t ble_bps_init(ble_bps_t * p_bps, ble_bps_init_t const * p_bps_init)
{
    ble_add_char_params_t add_char_params;
    ~~~~ 중략 ~~~~
    initial_feature_len = uint16_encode(p_bps_init->feature, init_value_encoded);
    add_char_params.uuid            = BLE_UUID_BLOOD_PRESSURE_FEATURE_CHAR;
    add_char_params.p_init_value    = init_value_encoded;
    ~~~~ 중략 ~~~~
    characteristic_add(p_bps->service_handle, &add_char_params, &p_bps->feature_handles);
}

uint32_t characteristic_add(uint16_t service_handle,
           ble_add_char_params_t *    p_char_props, ble_gatts_char_handles_t * p_char_handle)
{
     ble_gatts_char_md_t char_md;
     ble_gatts_attr_t    attr_char_value;
     ble_gatts_attr_md_t attr_md;
     ~~~~ 중략 ~~~~
     return sd_ble_gatts_characteristic_add(service_handle,&char_md, &attr_char_value,p_char_handle);
}
< 기타>
A> blood pressure profile
B> nRF Toolbox 앱 사용하기
▶ nRF Toolbox 앱 실행후 Bluood Pressure 버튼 클릭하기

▶ 장치 검색을 자동으로 진행합니다.

▶ BPS 장치가 advertise 중이면 다음처럼 화면에 표시됩니다.
▶ "Nordic_BPS" 장치를 선택하면 연결이되고 아래와 비슷한 화면이 출력됩니다.

▶ DK 보드의 Button1 을 누르면 Data 값이 새로 갱신이 됩니다.

그럼 수고하세요.

'Nordic_nRF52' 카테고리의 다른 글
| [nRF52 ] ble_app_cscs 프로젝트 분석 (0) | 2022.06.30 |
|---|---|
| [nRF52 ] ble_app_hrs_rscs_relay 프로젝트 분석 (0) | 2022.06.17 |
| [nRF52 ] ble_app_alert_notification 프로젝트 분석 (0) | 2022.06.13 |
| [nRF52] NRF_ERROR_NO_MEM 에러 디버깅 (0) | 2022.05.04 |
| [nRF52] nrfjprog 사용법 (--memrd, --log, --readcode, --readregs, --verify, --erasepage, --program,..) (0) | 2022.04.25 |