※ Alert notification application client role 예제
▶ Alert Notification Profile 의 client 역할 예제로 리셋후 30초 동안 fast advertising 을 하고 이후
180초 동안 slow advertising을 하고 연결이 안될경우 system-off 로 들어갑니다.
1> Nordic document
https://infocenter.nordicsemi.com/topic/sdk_nrf5_v17.1.0/ble_sdk_app_alert_notification.html
nRF5 SDK v17.1.0: Alert Notification Application
This example requires one of the following SoftDevices: S112, S132, S140 Important: Before you run this example, make sure to program the SoftDevice. The Alert Notification Application is an example that implements the client role of the Alert Notification
infocenter.nordicsemi.com
2> 프로젝트 위치
▶ <InstallFolder>\examples\ble_peripheral\ble_app_alert_notification
3> button 정의
| 버튼 | 정의 | 기타 |
| Button1 | Check the current state of New Alert and enable, disable, or clear the alert | |
| Button2 | Check the current state of Unread Alert and enable, disable, or clear the alert | |
| Button3 | Request peer to notify all current alert statuses. |
4> alert notification format
4-1> New alert notification

4-2> Unread alert notification

5> 테스트
▶ 문서상의 19단계를 한단계씩 진행해 보겠습니다.
5-1> 하이퍼터미널 실행후 Serial 설정을 다음처럼 합니다.
- Baud rate: 115.200
- 8 data bits
- 1 stop bit
- No parity
- HW flow control: None
5-2> 프로젝트 빌드및 프로그램하기
▶ SES 사용해 프로젝트 Open
==> File 메뉴의 Open Solution... 클릭

==> 아래그림처럼 .emProject 을 열기합니다.

▶ Compile (Build)
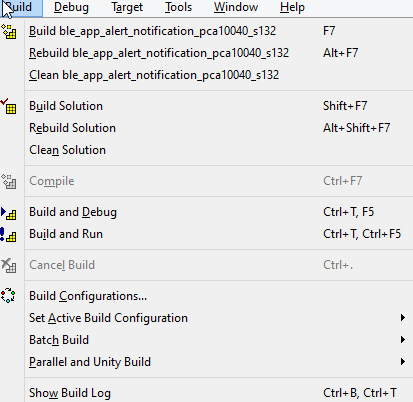
==> 정상적으로 build 성공시 로그
Rebuilding ‘ble_app_alert_notification_pca10040_s132’ from solution ‘ble_app_alert_notification_pca10040_s132’ in configuration ‘Release’
1> Assembling ‘thumb_crt0.s’
2> Compiling ‘nrf_log_backend_rtt.c’
3> Compiling ‘nrf_log_backend_serial.c’
4> Compiling ‘nrf_log_backend_uart.c’
5> Compiling ‘nrf_log_default_backends.c’
6> Compiling ‘nrf_log_frontend.c’
7> Compiling ‘nrf_log_str_formatter.c’
8> Compiling ‘app_button.c’
1> Compiling ‘app_error.c’
1> Compiling ‘app_error_handler_gcc.c’
2> Compiling ‘app_error_weak.c’
5> Compiling ‘app_scheduler.c’
3> Compiling ‘app_timer2.c’
7> Compiling ‘app_util_platform.c’
4> Compiling ‘crc16.c’
6> Compiling ‘drv_rtc.c’
8> Compiling ‘fds.c’
1> Compiling ‘hardfault_implementation.c’
2> Compiling ‘nrf_assert.c’
5> Compiling ‘nrf_atfifo.c’
7> Compiling ‘nrf_atflags.c’
4> Compiling ‘nrf_atomic.c’
1> Compiling ‘nrf_balloc.c’
2> Compiling ‘nrf_fprintf.c’
3> Compiling ‘nrf_fprintf_format.c’
6> Compiling ‘nrf_fstorage.c’
5> Compiling ‘nrf_fstorage_sd.c’
7> Compiling ‘nrf_memobj.c’
8> Compiling ‘nrf_pwr_mgmt.c’
4> Compiling ‘nrf_queue.c’
2> Compiling ‘nrf_ringbuf.c’
1> Compiling ‘nrf_section_iter.c’
3> Compiling ‘nrf_sortlist.c’
6> Compiling ‘nrf_strerror.c’
5> Assembling ‘ses_startup_nrf52.s’
7> Assembling ‘ses_startup_nrf_common.s’
4> Compiling ‘system_nrf52.c’
5> Compiling ‘boards.c’
7> Compiling ‘nrf_drv_clock.c’
1> Compiling ‘nrf_drv_uart.c’
2> Compiling ‘nrfx_atomic.c’
8> Compiling ‘nrfx_clock.c’
3> Compiling ‘nrfx_gpiote.c’
6> Compiling ‘nrfx_prs.c’
4> Compiling ‘nrfx_uart.c’
2> Compiling ‘nrfx_uarte.c’
5> Compiling ‘bsp.c’
1> Compiling ‘bsp_btn_ble.c’
8> Compiling ‘main.c’
7> Compiling ‘SEGGER_RTT.c’
6> Compiling ‘SEGGER_RTT_Syscalls_SES.c’
3> Compiling ‘SEGGER_RTT_printf.c’
4> Compiling ‘auth_status_tracker.c’
2> Compiling ‘ble_advdata.c’
1> Compiling ‘ble_advertising.c’
7> Compiling ‘ble_conn_params.c’
6> Compiling ‘ble_conn_state.c’
5> Compiling ‘ble_db_discovery.c’
4> Compiling ‘ble_srv_common.c’
3> Compiling ‘gatt_cache_manager.c’
8> Compiling ‘gatts_cache_manager.c’
4> Compiling ‘id_manager.c’
2> Compiling ‘nrf_ble_gatt.c’
1> Compiling ‘nrf_ble_gq.c’
7> Compiling ‘nrf_ble_qwr.c’
5> Compiling ‘peer_data_storage.c’
3> Compiling ‘peer_database.c’
6> Compiling ‘peer_id.c’
8> Compiling ‘peer_manager.c’
2> Compiling ‘peer_manager_handler.c’
7> Compiling ‘pm_buffer.c’
1> Compiling ‘security_dispatcher.c’
4> Compiling ‘security_manager.c’
3> Compiling ‘utf.c’
5> Compiling ‘ble_ans_c.c’
7> Compiling ‘nrf_sdh.c’
6> Compiling ‘nrf_sdh_ble.c’
3> Compiling ‘nrf_sdh_soc.c’
1> Generating linker script ‘ble_app_alert_notification_pca10040_s132.ld’
1> Linking ble_app_alert_notification_pca10040_s132.elf
Build complete
▶ Program

==> 정상적으로 Program 완료시 로그
Preparing target for download
Executing Reset script TargetInterface.resetAndStop()
Reset: Halt core after reset via DEMCR.VC_CORERESET.
Reset: Reset device via AIRCR.SYSRESETREQ.
Downloading ‘s132_nrf52_7.2.0_softdevice.hex’ to J-Link
Programming 2.7 KB of addresses 00000000 — 00000aff
Programming 146.3 KB of addresses 00001000 — 0002596b
J-Link: Flash download: Bank 0 @ 0x00000000: 1 range affected (4096 bytes)
J-Link: Flash download: Total: 0.682s (Prepare: 0.250s, Compare: 0.155s, Erase: 0.009s, Program & Verify: 0.128s, Restore: 0.137s)
J-Link: Flash download: Program & Verify speed: 31 KB/s
Download successful
Downloading ‘ble_app_alert_notification_pca10040_s132.elf’ to J-Link
Programming 45.2 KB of addresses 00026000 — 000314e3
Programming 0.0 KB of addresses 000314e4 — 000314f7
Programming 10.1 KB of .rodata addresses 000314f8 — 00033db5
Programming 1.5 KB of addresses 00033db8 — 000343f7
J-Link: Flash download: Bank 0 @ 0x00000000: 1 range affected (61440 bytes)
J-Link: Flash download: Total: 1.434s (Prepare: 0.103s, Compare: 0.047s, Erase: 0.038s, Program & Verify: 1.186s, Restore: 0.059s)
J-Link: Flash download: Program & Verify speed: 50 KB/s
Download successful
Communication timed out: Requested 4 bytes, received 0 bytes !
Target connection has been lost
Connecting ‘J-Link’ using ‘USB’
Connecting to target using SWD
Loaded C:/Program Files/SEGGER/SEGGER Embedded Studio for ARM 5.42a/bin/JLink_x64.dll
Firmware Version: J-Link OB-SAM3U128-V2-NordicSemi compiled Feb  2 2021 16:47:20
DLL Version: 7.58b
Hardware Version: V1.00
Target Voltage: 3.300
Device "NRF52832_XXAA" selected.
InitTarget() start
InitTarget() end
Found SW-DP with ID 0x2BA01477
DPIDR: 0x2BA01477
CoreSight SoC-400 or earlier
Scanning AP map to find all available APs
AP[2]: Stopped AP scan as end of AP map has been reached
AP[0]: AHB-AP (IDR: 0x24770011)
AP[1]: JTAG-AP (IDR: 0x02880000)
Iterating through AP map to find AHB-AP to use
AP[0]: Core found
AP[0]: AHB-AP ROM base: 0xE00FF000
CPUID register: 0x410FC241. Implementer code: 0x41 (ARM)
Found Cortex-M4 r0p1, Little endian.
FPUnit: 6 code (BP) slots and 2 literal slots
CoreSight components:
ROMTbl[0] @ E00FF000
[0][0]: E000E000 CID B105E00D PID 000BB00C SCS-M7
[0][1]: E0001000 CID B105E00D PID 003BB002 DWT
[0][2]: E0002000 CID B105E00D PID 002BB003 FPB
[0][3]: E0000000 CID B105E00D PID 003BB001 ITM
[0][4]: E0040000 CID B105900D PID 000BB9A1 TPIU
[0][5]: E0041000 CID B105900D PID 000BB925 ETM
Preparing target for download
Executing Reset script TargetInterface.resetAndStop()
Reset: Halt core after reset via DEMCR.VC_CORERESET.
Reset: Reset device via AIRCR.SYSRESETREQ.
Downloading ‘s132_nrf52_7.2.0_softdevice.hex’ to J-Link
Programming 2.7 KB of addresses 00000000 — 00000aff
Programming 146.3 KB of addresses 00001000 — 0002596b
J-Link: Flash download: Bank 0 @ 0x00000000: 1 range affected (4096 bytes)
J-Link: Flash download: Total: 0.685s (Prepare: 0.268s, Compare: 0.149s, Erase: 0.005s, Program & Verify: 0.126s, Restore: 0.136s)
J-Link: Flash download: Program & Verify speed: 31 KB/s
Download successful
Downloading ‘ble_app_alert_notification_pca10040_s132.elf’ to J-Link
Programming 45.2 KB of addresses 00026000 — 000314e3
Programming 0.0 KB of addresses 000314e4 — 000314f7
Programming 10.1 KB of .rodata addresses 000314f8 — 00033db5
Programming 1.5 KB of addresses 00033db8 — 000343f7
J-Link: Flash download: Bank 0 @ 0x00000000: Skipped. Contents already match
Download successful
==> 프로그램 완료후 booting시 Serial 메시지
<info> app_timer: RTC: initialized.
<info> app: Alert Notification client example started.
<info> app: Fast advertising
5-3> Alert Notification Service (ANS) server 만들기
: 위에서 프로그램한 client 보드가 아닌 다른 보드가 필요합니다.
a> nRF Connect for Desktop 어플을 실행해 줍니다.
==> 설치가 안되어 있다면 nordic 사이트에서 다운로드 하세요.

b> Bluetooth Low Energy 앱을 아래처럼 Open 해 줍니다.

c> Bluetooth Low Energy 실행 화면

d> SELECT DEVICE 클릭해 장치를 선택해 줍니다.
==> 장치 미발견시 화면

==> 장치 발견시 화면

▶ 아래 화면처럼 나오면 정상입니다.
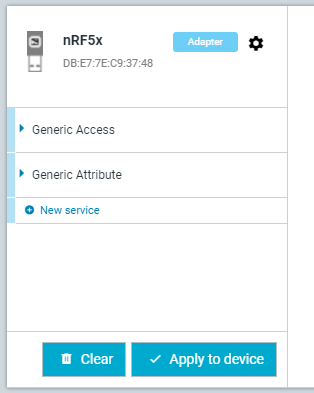
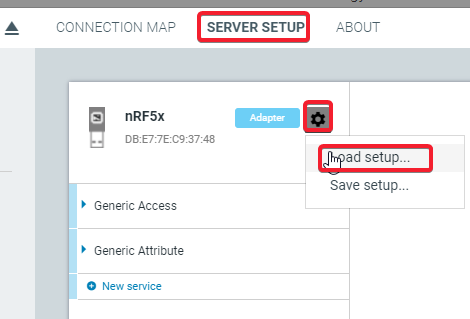
e> In Server Setup, click the settings button and select "Load setup".
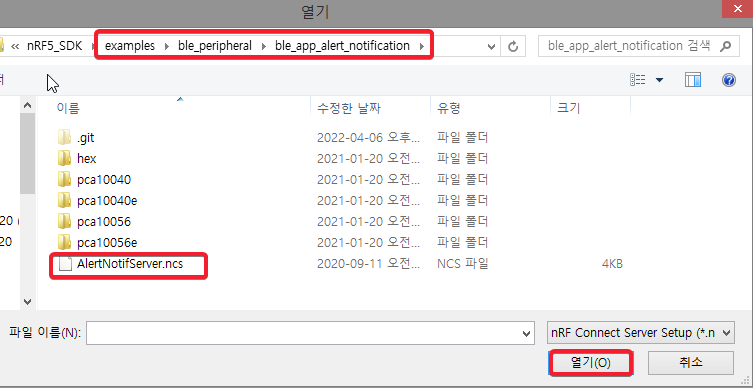
▶ AlertNotifServer.ncs 파일 선택하기
: In the resulting window, navigate to the <InstallFolder>\examples\ble_peripheral\ble_app_alert_notification folder.
Load the file AlertNotifServer.ncs.
f> Click "Apply to device" and navigate back to Connection Map.
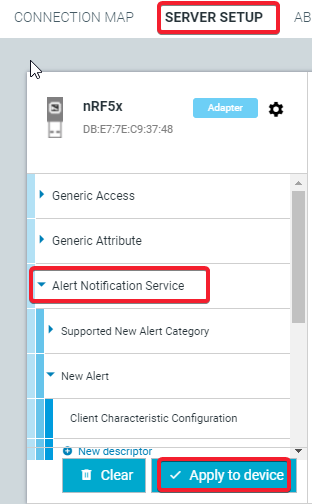
▶ CONNECTION MAP 으로 이동후 "Alert Notification Service" 가 존재하면 OK 입니다.

g> Set the values of characteristics with UUID 0x2A47 and 0x2A48 to 0xFF.
This tells the application that the server supports all categories of both New Alert Notification
and Unread Alert Notification. These values cannot be changed after a connection is established.
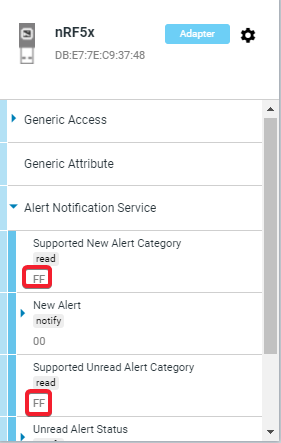
==> Supported New Alert Category(UUID:0x2A47) ,Supported Unread Alert Category( UUID:0x2A48)
5-4> nRF Connect 을 사용해 디바이스 연결하기
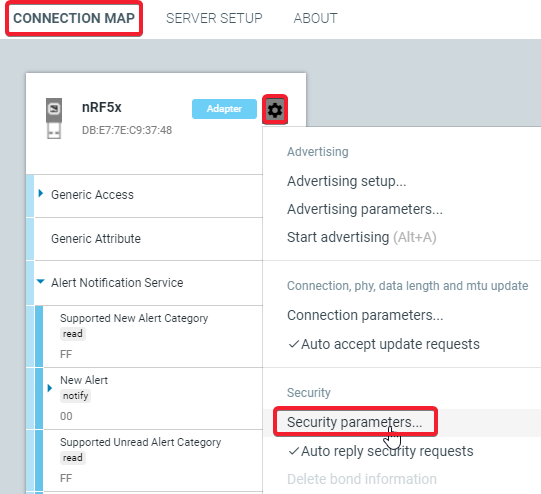
▶ To bond, click the settings button for the server in nRF Connect, select "Security parameters",
check "Perform Bonding", and click "Apply".

▶ connect to the device. Observe that the BSP_INDICATE_CONNECTED state is indicated.
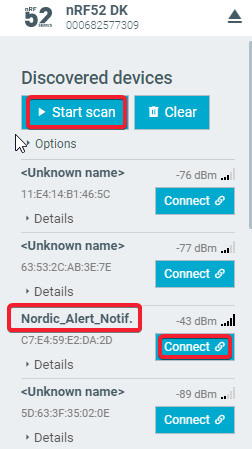
▶ 정상적으로 연결 완료되면 다음 화면처럼 보이실 겁니다.
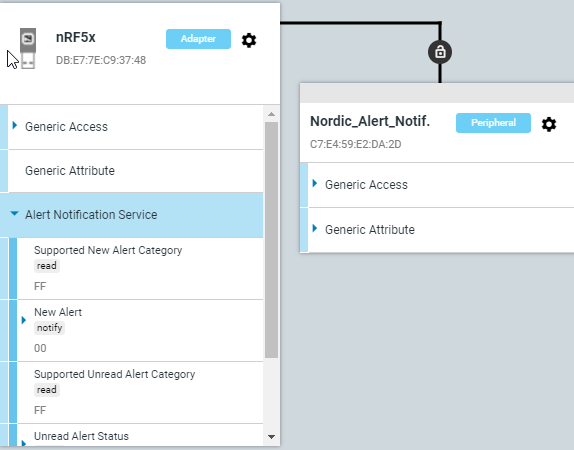
client 파트 UART 메시지
<info> app_timer: RTC: initialized.
<info> app: Alert Notification client example started.
<info> app: Fast advertising
<info> app: Connected.
<info> app: New Alert State: Enabled.
<info> app: Unread Alert State: Enabled.
==> 정상적으로 연결이 완료시 client 보드의 LED1 이 계속 켜져 있어야 합니다.
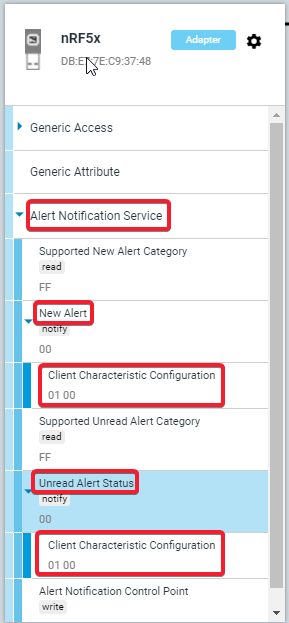
5-5> Upon connection, verify that the Client Characteristic Configuration descriptors (CCCD)
for the Unread Alert Status characteristic (0x2A45) and the New Alert characteristic (0x2A46) are set
to '01 00' (Alert Notification Enabled).
5-6> Upon connection, verify that the Alert Notification Control Point (0x2A44) is written
with the values 0x01 0xFF (Enable Unread Status Notification for all categories).

5-7> Set the value of the New Alert characteristic (0x2A46) to '03 01 4D 61 72 79' and
click the 'write' button. This sets the New Alert Notification. The value '03 01 4D 61 72 79' is
interpreted as the server having 1 new incoming call from "Mary".
Verify that the correct data is printed on the UART and that the BSP_INDICATE_ALERT_0 state is indicated.

==> client 파트 UART 메시지 확인 및 LED3이 블링킹 하고 있어야 합니다.
<info> app: New Alert state: On.
<info> app:   Category:                 Incoming call
<info> app:   Number of new alerts:     1
<info> app:   Text String Information:  Mary
5-8> Press Button 1 once. This clears the New Alert Notification. Verify that the message
"New Alert State: Off." is printed on the UART and that the BSP_INDICATE_ALERT_0 state is cleared.
==> client 장비의 Button1 을 한번 누르고 uart 메시지 확인 합니다. LED3 blinking 도 멈춤.
<info> app: New Alert State: Off.
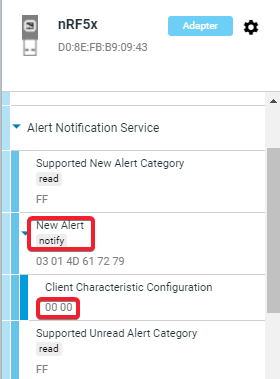
5-9> Press Button 1 again. This disables the New Alert Notification.
Verify in 'Server Setup' that the CCCD for 0x2A46 is set to '00 00' and that the message
"New Alert State: Disabled." is printed on the UART.
==> Client 장비의 Button1을 한번더 눌러주면 아래처럼 server 사이드 New Alert CCCD 값이 disable 되어
있어야합니다.
==> Client 장비 UART 메시지
<info> app: New Alert State: Disabled.
5-10> Set the value of the New Alert characteristic (0x2A46) to '03 02' and click the 'write' button.
This message should not be handled because New Alert Notification is Disabled.
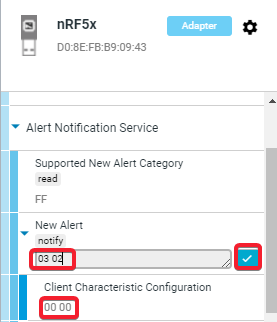
==> Client 장비 UART 로는 New Alert notification이 disable 상태이므로 어떤 메시지도 출력 되지 않습니다.
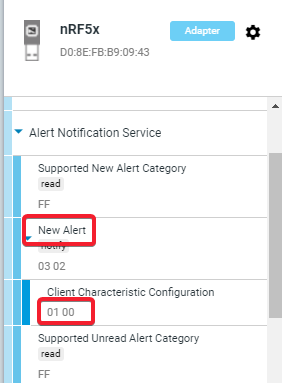
5-11> Press Button 1 again. This enables the New Alert Notification.
Verify in 'Server Setup' that the CCCD for 0x2A46 is set to '01 00'.
Verify that the message "New Alert State: Enabled." is printed on the UART
and that the BSP_INDICATE_ALERT_0 state is cleared.
▶ client 장비의 button1 누르기 밍 UART 메시지 확인
<info> app: New Alert State: Enabled.
▶ Server 파트의 New Alert 의 CCCD 값 확인하기
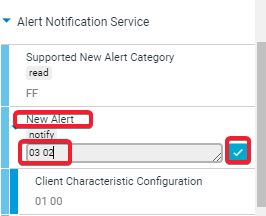
5-12> Set the value of the New Alert characteristic (0x2A46) to '03 02' and click the 'write' button.
This sets the New Alert Notification. The value '03 02' is interpreted as the server having 2 new incoming calls.
Verify that the correct data is printed on the UART and that the BSP_INDICATE_ALERT_0 state is indicated.
▶ New Alert 에 '03 02' 적고 쓰기버튼 클릭
▶ Client UART 메시지 및 LED3 blinking 확인
<info> app: New Alert state: On.
<info> app:   Category:                 Incoming call
<info> app:   Number of new alerts:     2
<info> app:   Text String Information:  Mary
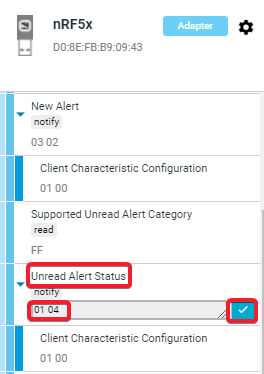
5-13> Set the value of the Unread Alert characteristic (0x2A45) to '01 04' and click the 'write' button.
This sets the Unread Alert Notification. The value '01 04' is interpreted as the server
having 4 unread email notifications.
Verify that the correct data is printed on the UART and that the BSP_INDICATE_ALERT_1 state is indicated.
▶ Unread Alert Status 에 '01 04' 적고 쓰기버튼 클릭
▶ Client UART 메시지 및 LED3 blinking 확인
<info> app: Unread Alert state: On.
<info> app:   Category:                 Email
<info> app:   Number of unread alerts:  4
5-14> Press Button 2 once. This clears the Unread Alert Notification.
Verify that the message "New Alert State: Off." is printed on the UART
and that the BSP_INDICATE_ALERT_1 state is cleared.
▶ client 장비 Button2 누르기
==> 아래와 같이 uart 메시지 출력 됩니다.
<info> app: Unread Alert State: Off.▶ LED3 blinking 도 꺼짐.
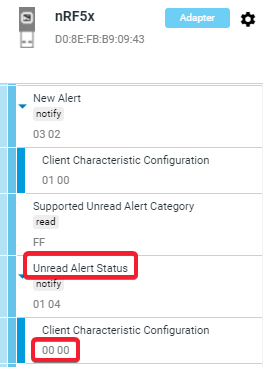
5-15> Press Button 2 again. This disables the Unread Alert Notification.
Verify in 'Server Setup' that the CCCD for 0x2A45 is set to '00 00'
and that the message "New Alert State: Disabled." is printed on the UART.
▶ client 장비 Button2 누르기
==> 아래와 같이 uart 메시지 출력 됩니다.
<info> app: Unread Alert State: Disabled.
▶ Unread Alert Status 의 CCCD 값이 '00 00' 인지 확인하기
5-16> Disconnect the device in nRF Connect
and observe that the BSP_INDICATE_ADVERTISING state is indicated.
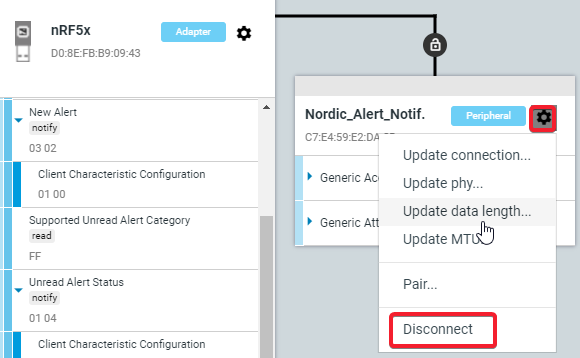
▶ client 장비 LED1 이 blinking 하는지 확인 및 UART 메시지 확인하기
<info> app: Fast advertising
<info> app: Disconnected.
<info> app: Slow advertising
5-17> Wait until the application goes to system-off (BSP_INDICATE_IDLE).
▶ fast advertising 30초 , slow advertising 180초 이후 system-off 확인하기
모든 LED OFF 되야합니다.
system-off 전 uart 메시지는 더이상 없습니다.
5-18> Press Button 1 and reconnect to nRF Connect.
Observe that the BSP_INDICATE_CONNECTED state is indicated.
▶ client 장비 button1 누를경우 uart 메시지
<주의사항 > system-off 상태에서 button1 을 눌러야 합니다.
<info> app_timer: RTC: initialized.
<info> app: Alert Notification client example started.
<info> app: Fast advertising
▶ server 장비의 "Connect"버튼 클릭
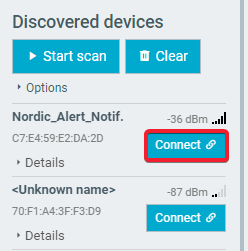
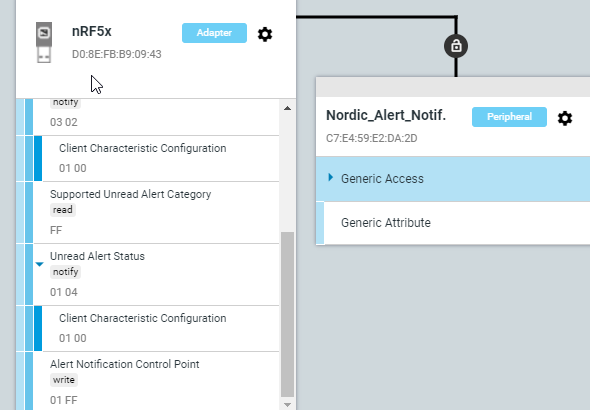
▶ client 장비 connect 시의 UART 메시지
<info> app: Fast advertising
<info> app: Slow advertising
<info> app: Connected.
<info> app: New Alert State: Enabled.
<info> app: Unread Alert State: Enabled.
5-19> Disconnect from nRF Connect.
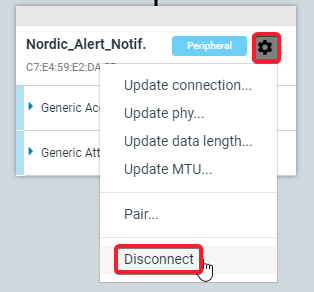
<기타>
A> Roles / Service Relationship

B> nRF Connect ==> Programmer 를 통해 읽은 메모리 정보

그럼 수고하세요.

'Nordic_nRF52' 카테고리의 다른 글
| [nRF52 ] ble_app_hrs_rscs_relay 프로젝트 분석 (0) | 2022.06.17 |
|---|---|
| [nRF52 ] ble_app_bps 프로젝트 분석 (0) | 2022.06.14 |
| [nRF52] NRF_ERROR_NO_MEM 에러 디버깅 (0) | 2022.05.04 |
| [nRF52] nrfjprog 사용법 (--memrd, --log, --readcode, --readregs, --verify, --erasepage, --program,..) (0) | 2022.04.25 |
| [nRF52] ble_app_hids_keyboard 예제에 wdt 추가하기 (0) | 2022.04.20 |
